
Interactive activities: match, order, fill in the blanks and word search
Add graded activities to a unit: match definitions, put steps in order, fill in the blanks and word search. How attempts, solutions and grades work, how they reach the Gradebook, and how to see each student's results.
On this page
In this topic 5
- Add lessons, videos and required reading to a subject
- Upload and compress videos: up to 20 GB, automatic compression and fast playback
- Live classes and 1:1 tutoring with Zoom, Google Meet or Teams
- Document viewers: PDF, Word, PowerPoint, Excel and code inside your academy
- Interactive activities: match, order, fill in the blanks and word search
In this guide
- How to add an interactive activity to a unit and which types exist.
- The settings shared by every graded type: minimum grade, attempts and Show solutions.
- Match definitions, put steps in order, fill in the blanks and word search, one by one.
- How the grade reaches the Gradebook and how to see each student's results.
Add an interactive activity
Interactive activities are short exercises that students do on screen and that are graded automatically.
-
Open the unit
Go to Subjects, open the subject and go to the Content tab.
-
Click Add activity
In the unit where the activity belongs, click Add activity and choose the type.
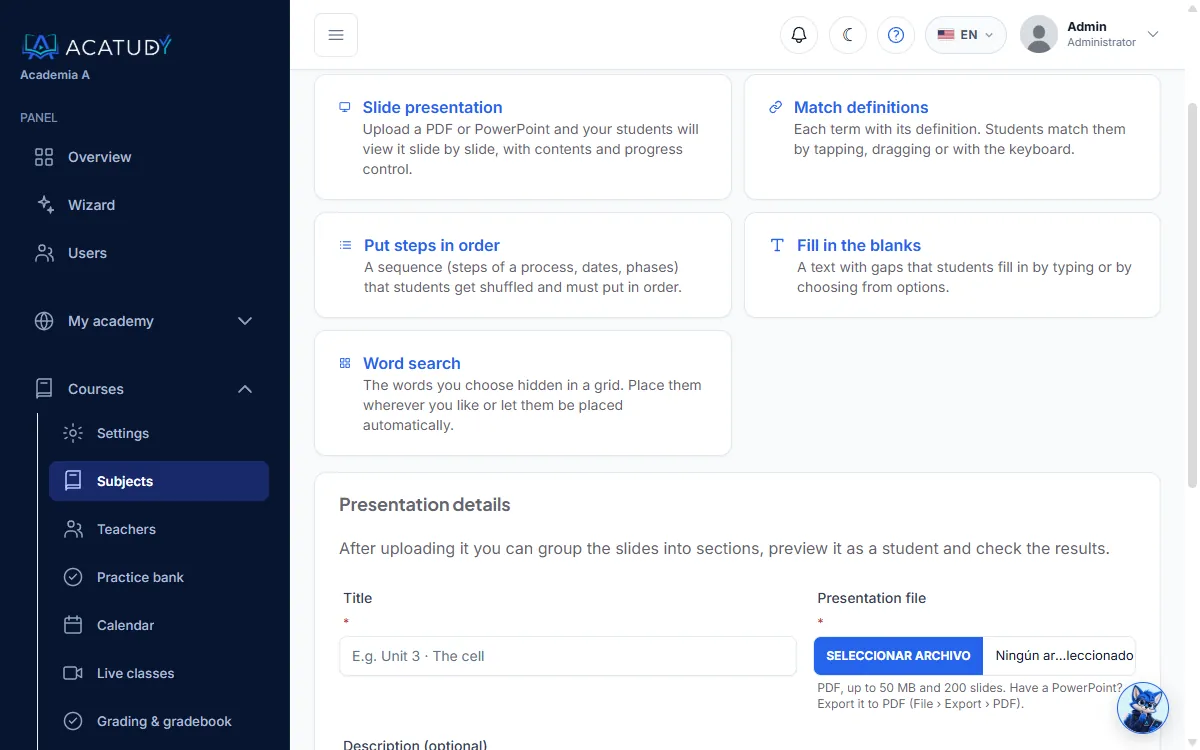
Choosing the type of activity.
| Type | What the student does |
|---|---|
| Slide presentation | Reads slides. It already existed and is not covered here. |
| Match definitions | Links each term with its definition. |
| Put steps in order | Sorts a shuffled list of steps. |
| Fill in the blanks | Completes the gaps of a text. |
| Word search | Finds hidden words in a grid. |
Settings shared by every graded type
The four graded types work the same way, so you learn the options once.
- Grade: from 0 to 10, calculated as correct answers ÷ total × 10.
- Passing score (optional): until the student reaches it, the activity doesn't count as done.
- Attempts (optional): from 1 to 50. Leave it empty for unlimited attempts. The best grade is the one that counts.
- Required: counts toward the subject's sequential progress. Visible to students shows or hides the activity.
- Every attempt shuffles the order of the items, so no two attempts look the same.
Show solutions has three options:
| Option | When the student sees the solutions |
|---|---|
| When finished (default) | When they have no attempts left or score a 10. Passing doesn't unlock them while attempts remain, because the best grade counts. |
| After every submission | Right after every attempt. It's meant for revision. With unlimited attempts, students can copy the solutions. |
| Never | Students only see which answers were right and which were wrong. |
Grading always happens on the server. The student's browser never receives the solutions, whatever option you choose.
On every activity you also get two teacher buttons: Preview as a student (it saves nothing and shows the solutions at the bottom) and Results.
If you edit an activity that some students have already started, their open attempts are graded with the version they saw.
Match definitions and put steps in order
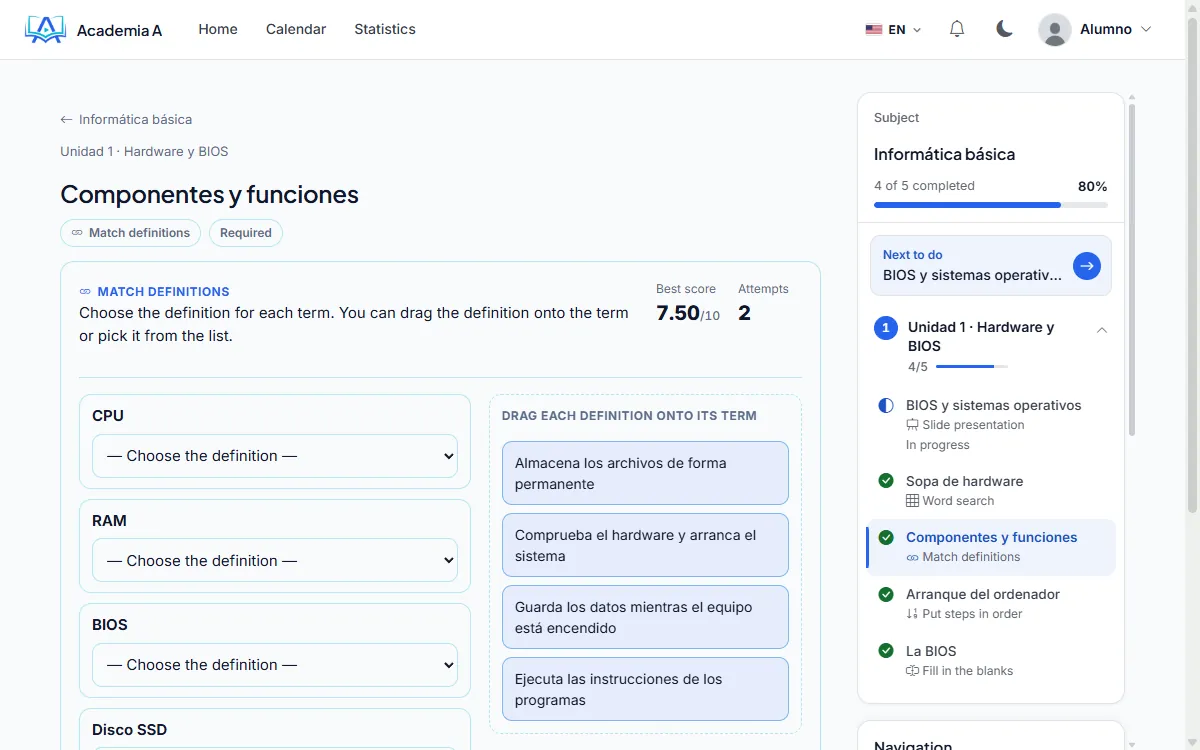
Match definitions
Write from 2 to 20 pairs. Each term can have up to 200 characters and each definition up to 400. The student chooses the definition for each term in a drop-down list, or drags the definition onto the term with the mouse or a finger.
Put steps in order
Write from 3 to 20 steps in the correct order. The student receives them shuffled and moves them by dragging the handle, or with the move up and move down buttons, which work with the keyboard. Each step that ends up in its exact position scores a point.
Fill in the blanks
Write the text (up to 5,000 characters) and mark each blank with double square brackets. Separate the alternative valid answers with a vertical bar: The capital of France is [[Paris|paris]]. A text can have up to 50 blanks.
The Students setting offers three modes:
-
Type the answer
The student types each answer. You can choose to ignore accents (on by default, although the ñ is always respected) and to match upper and lower case.
-
Chooses from options (each gap has its own)
Under the text, one line appears per blank. Write its wrong options there, separated by a vertical bar, for example Rome | London. You need between 1 and 6 per blank, and any option equal to the answer is discarded. The student sees the answer mixed with those options, in a different order on every attempt. How the options look lets you choose a drop-down list in each blank or Tappable chips.
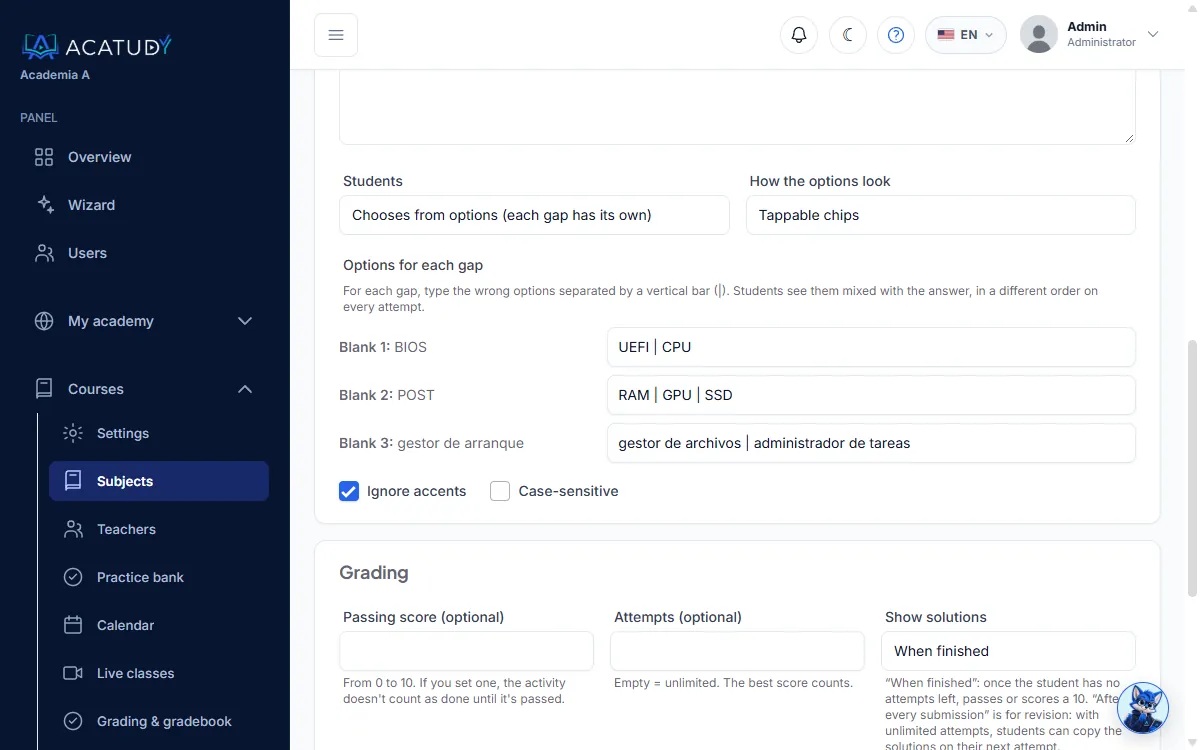
One line of wrong options for every blank. 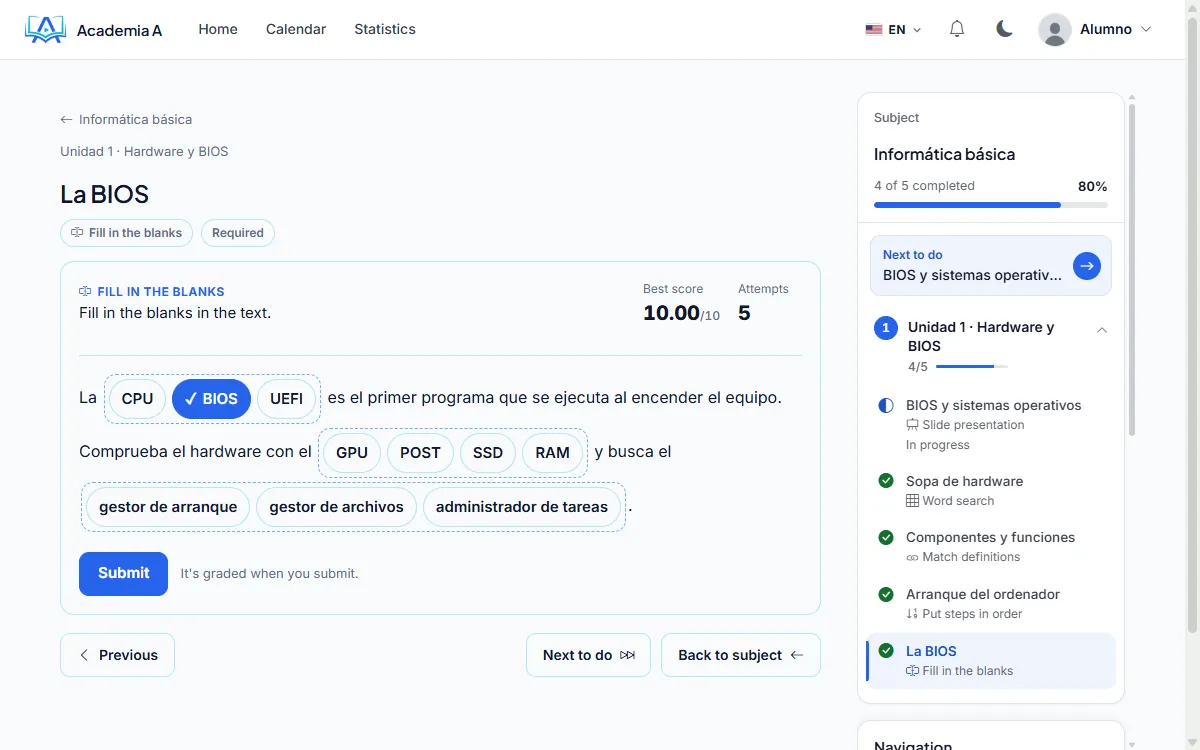
Chips: they can be chosen with a finger or the keyboard arrows. -
Chooses or drags words from a shared word bank
A single bank holds the answers of all the blanks plus the extra words you add (one per line, up to 30). The student drags them into the blank or chooses them in the drop-down list.
None of this uses AI: you write the options yourself.
Word search
Build a grid from 6 to 20 rows and columns with up to 25 words of at least 3 letters each.
- Filler alphabet: Spanish (with Ñ), English, French or Italian. By default it is your academy's language.
- Words are normalized: upper case, no accents (except the Ñ in Spanish), and no spaces or hyphens.
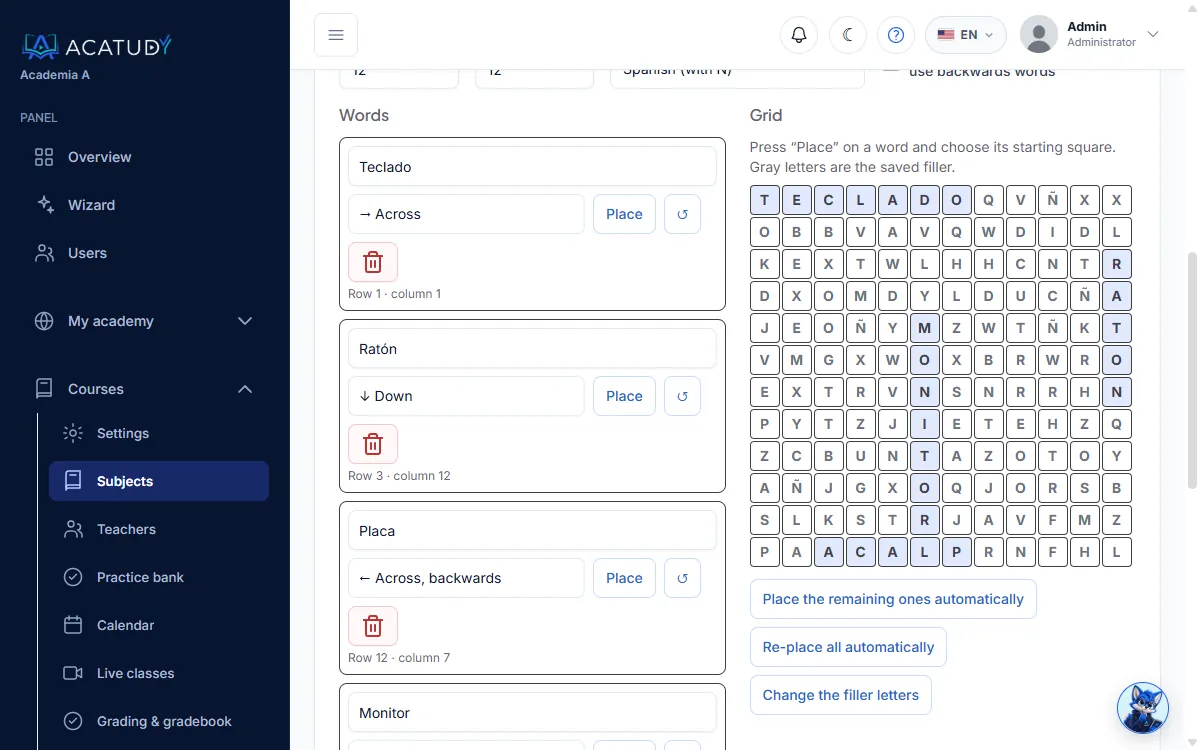
Place the words
For each word, choose the direction: horizontal, vertical or one of the two diagonals, forwards or backwards. Click Place and then the starting cell in the grid. Or let the words be placed for you with Place the remaining ones automatically and Re-place all automatically; tick When placing automatically, also use backwards words if you want reversed words there too. If a word doesn't fit or collides with another one, the error appears on that word.
Filler letters
The remaining cells are filled with random letters, without AI, and the grid avoids forming a word from your list again by chance. Change the filler letters generates a different set.
What the student does
The student marks the first and the last letter of a word by dragging, by tapping two cells (on a phone) or with the keyboard: arrows to move, Enter or Space to mark the start and the end, and Escape to cancel.
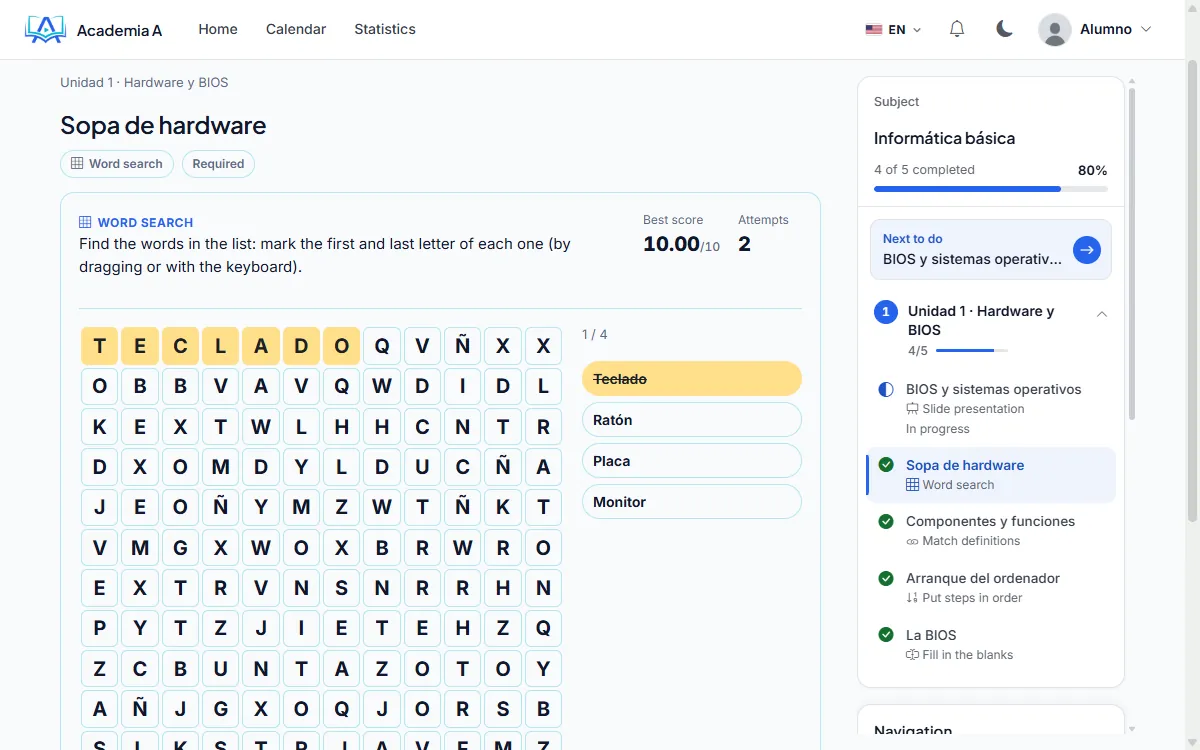
The server checks every selection. Mistakes are counted, and you see them in Results. When the student finds every word, the attempt is submitted automatically. They can also click Finish and be graded on the words found so far.
Grades, Gradebook and results
The grade goes to the Gradebook, in the columns of the Activity group. It only counts toward the subject's grade if, in the subject's Grade weights (subject settings), you give weight to the Interactive activities component. By default its weight is 0.
The Results button of each activity shows, per student: best grade, attempts, mistakes, time spent and the detail of each attempt.
Accessibility and mobile
Everything works with the keyboard and a screen reader: there is always an alternative to dragging. On a phone, activities fit the screen without horizontal scrolling.
Frequently asked questions
Why can't a student see the solutions?
It depends on the Show solutions option. With When finished, the student sees them only when they have no attempts left or score a 10. With Never, they don't see them at all.
Does it count toward the subject's grade?
Only if you give weight to Interactive activities in the subject's Grade weights. By default the weight is 0, so the activity appears in the Gradebook but doesn't change the final grade.
Can I change an activity that has already been started?
Yes. Open attempts are graded with the version the student saw, so nobody is affected by your edit.
Is AI used?
No. Options, words and fillers are written by you or generated at random, never by AI.
Follow this guide in your own academy
Create it free in a couple of minutes and keep your admin panel open next to this guide.
Open a ticket from Help → Support in your panel: we reply within 24–48 h depending on your plan.
