
Design your student area: styles, logo, colors, home and menu
Appearance brings together everything your students see: apply a preset style made for your type of academy, upload your logo, fine-tune colors and shape, choose the student area mode and set up the home page, menu and statistics, all with a live preview.
On this page
In this topic 7
- Design your student area: styles, logo, colors, home and menu
- Build and publish your website with the Website Builder
- Connect your own domain (CNAME or A record) with automatic HTTPS
- SEO and Google Search Console: sitemap, robots.txt and site verification
- Design your sign-in and sign-up pages: 14 layouts with your image and text
- FAQs for your students and visitors: help center, order and FAQ rich results
- WordPress plugin: sell your courses and add single sign-on
In this guide
- Try and apply a preset style made for your type of academy.
- Upload your logo and favicon and set your academy's name.
- Fine-tune brand colors and the interface shape, with contrast checks.
- Choose the student area mode and customize the vertical (campus-style) mode.
- Decide what students see on their home page, in their menu and in their statistics.
Everything lives in My academy → Designer → Appearance. The sections are listed on the left and a live preview of the student area stays on the right: it reflects what you change in any section before you save, on desktop or mobile and in light or dark mode. Each section has its own save button; the section list marks any section with unsaved changes.
1. Preset styles
Preset style offers complete styles designed for US academies: Test Prep (SAT, ACT, AP), Bright Classroom (K-12 tutoring), Language Lab, Music Studio, Driving school (DMV permit test), Classic Campus (colleges), Professional Training, Minimalist, STEM Lab, Night Owl and Early Learners. Each one sets the palette, the interface shape (fonts, corners, shadows), the question style, the vertical mode details and a recommended student area mode.
-
Preview it
Hover over a style or select it: the big preview shows it with your content before you apply anything.
-
Apply it
Click Apply style…. A confirmation lists exactly what will change (colors, shape, question style and vertical mode details). If the style recommends another mode, you can tick Also switch the student area…. Your logo, favicon, names and texts, and the student home, menu and statistics never change.
Tip
Start with the style closest to your academy, then change only the primary color in Colors & shape. Appearance shows it as “Style, with changes”, and applying the style again restores its values.
2. Identity: name, logo and favicon
-
Name your academy
Set the Commercial name (e.g. Brightpath Tutoring) and a short name for small spaces.
-
Upload your logo and favicon
Logo (max. 2 MB): a horizontal PNG or SVG with a transparent background works best; the preview shows it right away. Favicon (max. 2 MB): a square image (e.g. 512×512 px) with just your symbol or initials.
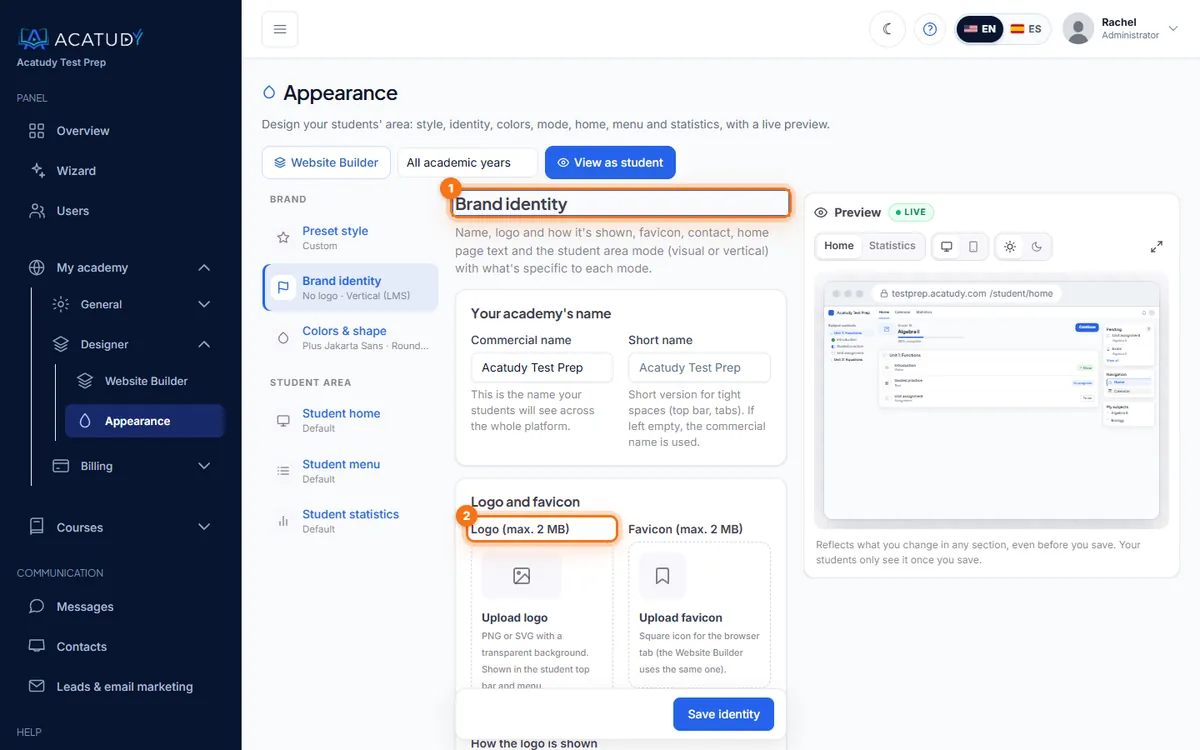
Appearance, Identity section with logo and favicon fields. -
Contact and home page texts
Add the support email students will reply to, and the slogan and description of your home page. Click Save identity.
3. Colors and shape
-
Pick a recommended palette or your own colors
Click one of the Recommended palettes or set the Primary color, Secondary color, background and text yourself, e.g. primary
#2563EB. Leave a color empty to use the platform default. -
Check the contrast
Below the colors, Appearance checks the text on your background and the text on your buttons. If it says Low contrast, choose a darker primary or text color.
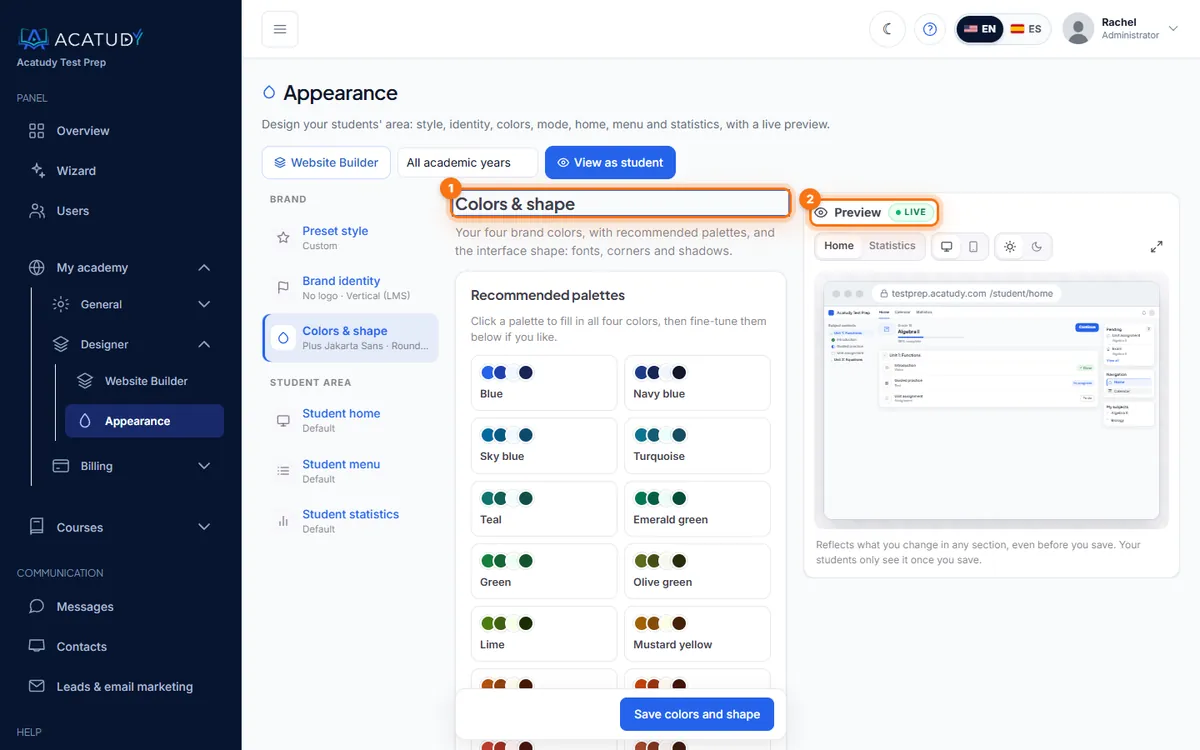
Colors with recommended palettes and live preview. -
Choose the interface shape
Interface shape sets fonts, corners and shadows (Acatudy, Academic, Minimalist or Corporate). Click Save colors and shape. Restore default colors and Restore default theme bring back the originals.
4. Student area mode
In Brand identity → Student area mode (the Your academy's mode card) you choose how your students experience the platform: Visual (Cards), a home page with a card per module, or Vertical (LMS, campus style), subjects with their units, activities and progress. Switching modes never deletes content; it also changes what your Courses menu shows. Compare both in Visual or vertical mode.
Vertical mode only (LMS) lets you adjust a few details of the campus view without losing its clean look:
- Top bar: light (default), your brand color or dark.
- Side index and right panel: neutral background (default) or lightly tinted with your brand.
- Progress and statuses: brand progress with Done in green (default), all in your brand color, or all in green.
- Activity rows: comfortable (default) or compact.
- Corners: soft (8 px, default), square (4 px) or rounded (14 px).
- Heading font: understated Inter (default) or the brand font Plus Jakarta Sans.
- What is shown: the Pending panel on the right and each subject's thumbnail.
- Detail colors in groups (borders and dividers, dropdowns and menu, progress, counters and links, video player frame), each with its own Reset button. If a color is hard to read on white, a warning appears below it.
The preview shows the subject page; switch it between light and dark to check both modes. Restore defaults brings back the original design.
5. Student home, menu and statistics
- Student home: turn on, off and reorder the cards students see first (tests and exams, assignments, documents and media, calendar), with their width and an optional background image. It's the home page of the visual mode.
- Student menu: choose which items appear in the student's menu and in which order.
- Student statistics: choose the blocks of the statistics page and their order.
The arrows reorder items right away and the preview follows; nothing changes for students until you save. Restore default brings back the original set and order. Items whose module is turned off in your plan are never shown to students.
Frequently asked questions
Does this change my public website?
Your public pages are designed in the Website Builder, which has its own global styles. Appearance controls the student area, login, emails and documents. Use the same colors in both for a consistent brand.
Where did Student home, Student menu and Statistics go?
They used to be under My academy → General. They are now sections of Appearance, next to the preview; the old links still work and take you there.
Where do I change the question style?
Each preset style brings one; you can change it any time in Courses → Settings → Tests & exams, together with the wrong-answer penalty and the syllabus order.
Can I remove the Acatudy branding?
On the Professional and Institutional plans, the Acatudy footer branding is removed.
Where do I change the favicon of the website?
Here, in Appearance › Identity: the Website Builder uses the same favicon.
Follow this guide in your own academy
Create it free in a couple of minutes and keep your admin panel open next to this guide.
Open a ticket from Help → Support in your panel: we reply within 24–48 h depending on your plan.