
Email marketing and automations: announcements, drip emails and consent
Schedule announcements to your students, send a welcome email automatically after sign-up and congratulate students who finish a subject. Only students with marketing consent receive them, always with an unsubscribe link.
On this page
In this guide
- Who can receive marketing emails (consent).
- Schedule a one-off send: now, in N days or on a date.
- Create automations and sequences triggered by sign-ups, completed subjects, payments or inactive students.
- Follow every send in the log.
Before you start
- Email marketing is included in the Professional and Institutional plans. On Free and Basic the page is visible but locked.
- Only students with marketing consent receive emails. Consent comes from the checkbox "I agree to receive marketing communications" when a student signs up, or from a consent checkbox in one of your forms. Students you add manually have no consent recorded.
- Every email includes an unsubscribe link, as required by the CAN-SPAM Act and the GDPR.
Schedule a send
-
Open Email marketing
Go to Communication → Leads & email marketing, tab Email marketing.
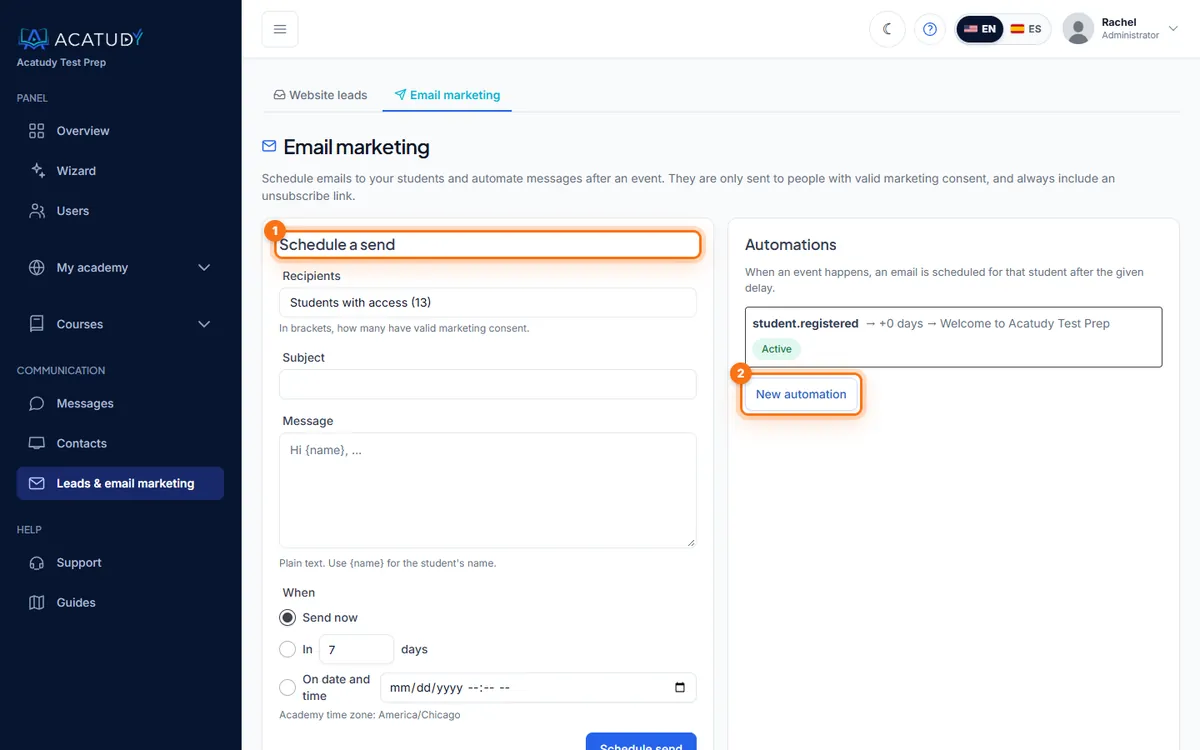
Email marketing: Schedule a send and New automation. -
Choose the recipients
Recipients: Students with access, Students without access or All students. The number in brackets is how many have valid consent, so you know exactly how many emails will go out.
-
Write the subject and message
The message is plain text. Use
{name}for the student's first name:Subject: Fall SAT bootcamp — 5 seats left Hi {name}, Our 8-week Fall SAT Bootcamp starts Monday, September 8. Classes are Mon/Wed 4:30–6:00 PM, plus a full practice test every Saturday. Reply to this email to save your seat. — Brightpath Tutoring -
Choose when
Send now, In N days (1–365) or On date and time, which uses your academy's time zone. Click Schedule send.
Create an automation
An automation is: when this happens → wait → send this email to that student.
-
Click New automation
In the Automations panel.
-
Choose the event
- Student sign-up: fires when a student registers (on your site or with Google) or when you add one.
- Subject completed (100%): fires when a student completes every resource of a subject.
-
Set the delay and the email
Delay: 0–365 days plus 0–23 hours. Example: Student sign-up → 1 day → "Welcome! Here's how to take your diagnostic test". Or: Subject completed → 0 days → "Congrats, {name}! Here's 15% off the next level".
-
Activate it
Save and activate. You can deactivate, edit or delete it any time; deleting an automation cancels its pending sends.
Sequences and exit conditions
Several automations on the same event form a sequence: the list groups them under the event and numbers them (Email 1, Email 2…) by delay.
- Events: Student sign-up, Subject completed 100%, Student payment (once per purchase) and Inactive student (14 days without signing in; checked once a day).
- Exit condition: each email can stop if the student already has paid access or signs in again. It's checked right before sending, so an offer never reaches someone who already paid.
- Create a sample sequence: ready-made welcome (3 emails), win-back for inactive students (2 emails) and thank-you after payment. They're created turned off so you can review the text before turning them on.
Tip: a three-email welcome sequence
Create three automations on Student sign-up with delays of 0, 3 and 7 days: welcome and login link, how to use practice tests, and an offer for full access with the exit condition Stop if the student already has paid access. It runs by itself for every new student.
Follow your sends
Scheduled sends lists every email with its status (Pending, Sending, Sent, Failed, Cancelled, Paused) and its Source (Manual or Automation). You can cancel a send while it's still pending. Emails go out in batches every minute; a failed send is retried twice before being marked as failed.
If your plan changes to one without email marketing, pending sends are paused, not lost, and resume when you upgrade again.
Grow your list with forms and leads
- Forms (outside the menu): surveys with short/long text, email, single or multiple choice and 1–5 star ratings, each with a public link. Tick "Include a consent checkbox for the use of data for marketing purposes" to collect consent.
- Communication → Leads & email marketing: messages from the Contact and Newsletter blocks of your website, with CSV export. Leads aren't added to email marketing automatically; they're prospects, not students.
Frequently asked questions
Can I design HTML emails with images?
Not yet: messages are plain text, which also helps them land in the inbox rather than the Promotions tab.
Is there a sending limit?
Monthly quota: 5,000 marketing emails on Professional and 25,000 on Institutional (campaigns and automations; tests don't count). Emails are sent in batches of up to 200 per minute.
Can I email parents or leads who aren't students?
Email marketing sends to your students with consent. Export website leads as CSV if you want to contact them from another tool.
Follow this guide in your own academy
Create it free in a couple of minutes and keep your admin panel open next to this guide.
Open a ticket from Help → Support in your panel: we reply within 24–48 h depending on your plan.