
Add and manage students: access, courses and plan limits
Enroll students one by one or let them sign up, place them in the right course, and turn access on when they pay. No plan limits the number of students.
On this page
In this guide
- Add a student manually and choose which courses they see.
- Choose a paid or free access mode, and use the Paid / Unpaid switch to control who gets in.
- Let students sign up on their own from your academy website.
- Understand plan limits and what students see when they log in.
How student access works
Every student belongs to your academy. In a paid academy (the default), each student also has an access status: Paid (full access to the subjects of their courses) or Unpaid (they can sign in and see their Home, but opening any content takes them to your plans page). You set the status by hand, or Stripe sets it when they buy an access plan. That's how you control access whether you charge tuition by Stripe, check, Zelle or in person. In a free academy, every student has access.
Students see every subject in the courses you assign them. For example, a student in Grade 10 automatically sees Algebra II, Biology and English 10. A Stripe plan for specific subjects, the Individual subjects you tick in the student's form, or a teacher enrolling them in their own subjects adds just those subjects (without the rest of the course).
Paid or free access mode
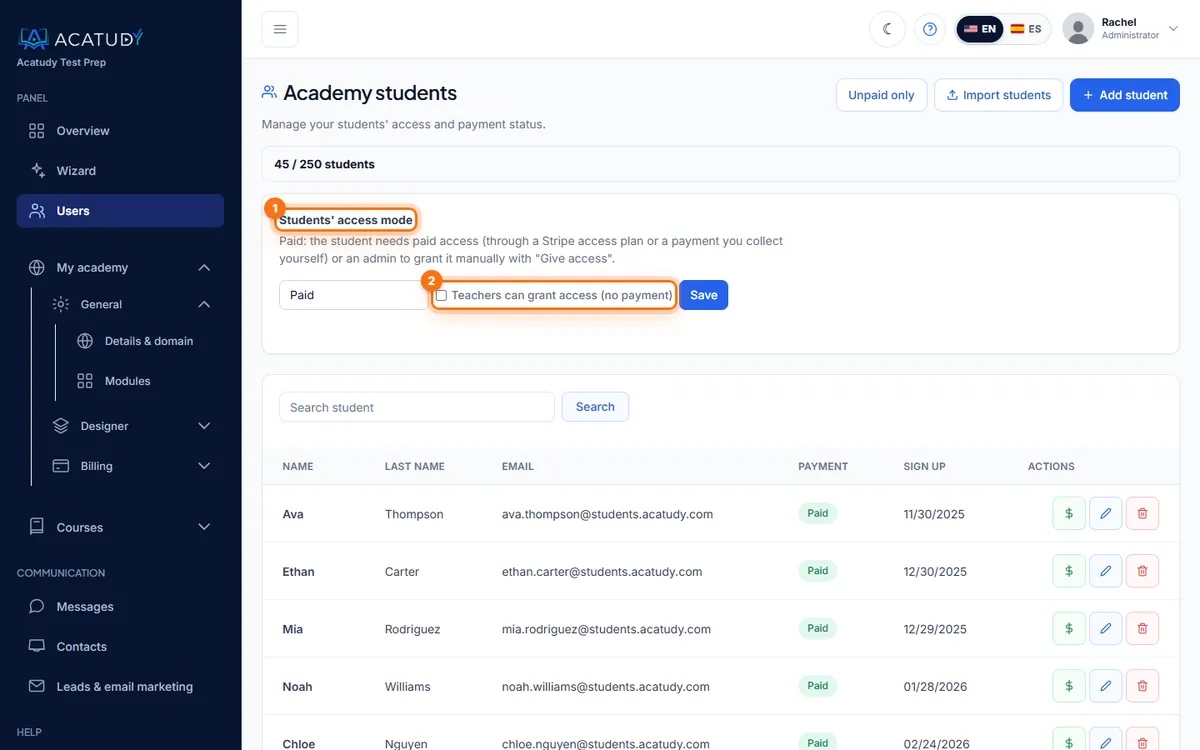
At the top of Users, the Students' access mode card decides how access works for the whole academy.
| Mode | Who has access | Use it when |
|---|---|---|
| Paid (default) | Students marked Paid: by you, or automatically when they buy an access plan | You charge tuition, with Stripe or on your own |
| Free / direct enrollment | Every active student, right away. Prices and "no access" warnings are hidden | A school, a company or a free program |
- Switching from paid to free gives access at once to every student who didn't have it.
- Switching from free to paid doesn't take access away from anyone.
- In paid mode, tick Teachers can grant access (no payment) if teachers should be able to give access to the students they enroll. See Invite teachers.
- There's no mixed mode. To sell some subjects and give others away, use access plans per subject.
Choose the mode and click Save. The setup wizard also asks it ("Do your students pay to access it?").
Add a student manually
-
Open the student list
Go to Users. You'll see every student with their payment status and sign-up date. Use the search box (name or email) or the Unpaid only filter to find people quickly.
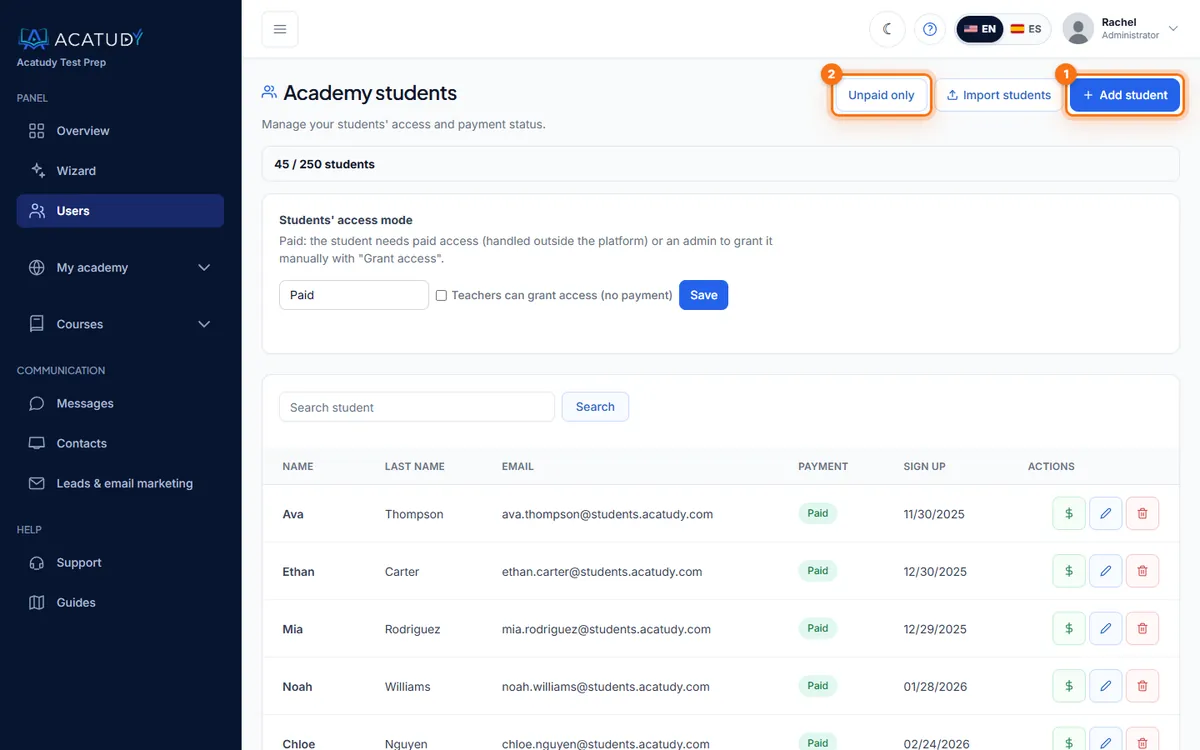
Student list with Add student and Unpaid only. -
Click Add student
Fill in First name, Last name and Email. Set a Password (8+ characters). It's only required if the email is new to the platform: if the student already has an Acatudy account from another academy, their existing account is simply linked to yours.
-
Tick their courses
Under Courses, tick the ones the student belongs to, e.g. Grade 10 and SAT Prep. If your academy has only one course, every student sees it automatically.
-
Decide on access and save
Give full access now is ticked by default. Untick it if the student still has to pay you. Click Add student.
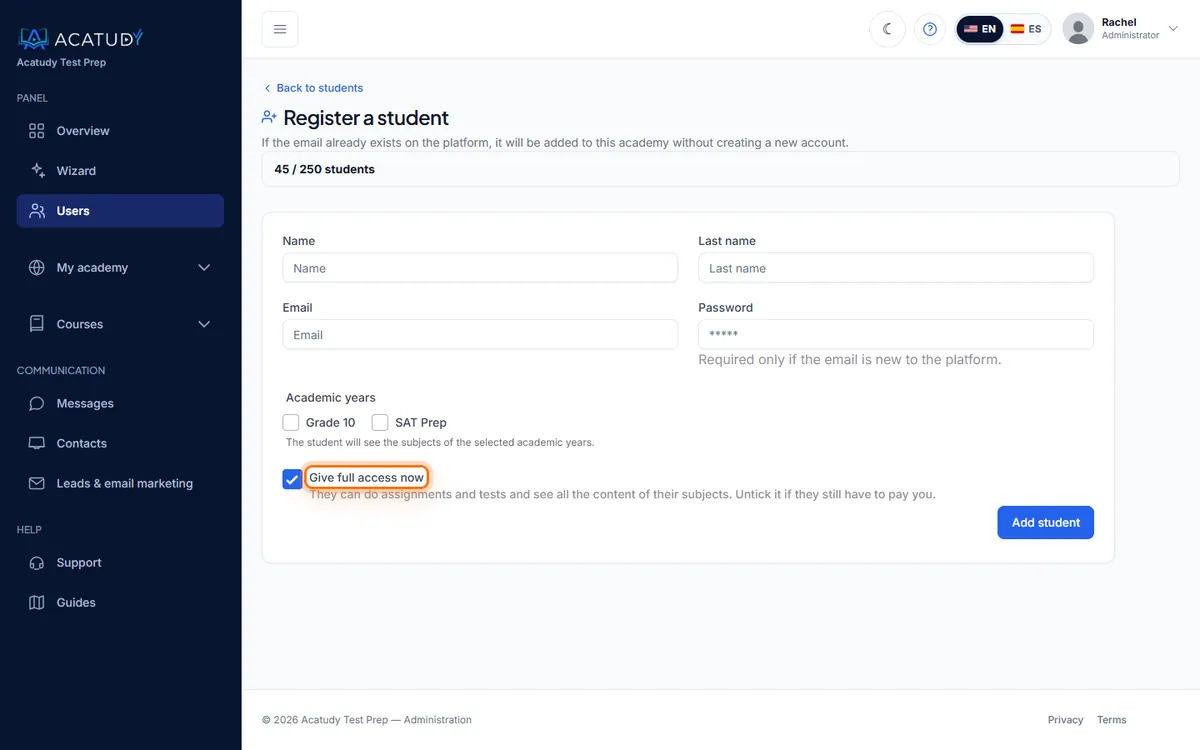
Register a student form with courses and Give full access now. -
Share the login details
Students added by an admin don't receive an automatic invitation email, so send them their login address and password yourself (for example in your welcome email or at orientation).
Tip: assign a whole class at once
You can also assign students from the course itself: open Courses → Settings → Courses, choose the course and use Students in this course → Save students. It's the fastest way to place a whole class in Grade 11 at the start of the school year.
Turn access on and off
In paid mode, each row of the student list has a $ button: Give access (mark as paid) / Mark as unpaid. If several students have no access, a warning above the list offers View students without access and Give access to all. The badge switches between Paid and Unpaid instantly. You can do the same from the edit form with the Paid in this academy checkbox.
- A family pays the September tuition → mark the student as paid.
- A payment bounces or the term is over → mark them as unpaid. Their progress and submissions are kept for when they come back.
Every change is recorded in the activity log shown on your dashboard.
Good to know
Access you give by hand has no expiration date: put a reminder in your calendar when a term ends, or use the Unpaid only filter to review who's pending. Access bought with a Stripe subscription ends on its own if the subscription is canceled or unpaid.
Let students sign up on their own
Students can create their own account on your academy's address, at yourslug.acatudy.com/student/register (or on your custom domain). They enter first and last name, a nickname, email and a strong password (mixed case, numbers and symbols), accept your terms and, optionally, agree to receive marketing emails from your academy.
In paid mode, self-registered students start as Unpaid (in free mode they get access right away). You'll see them in Users ready to be activated. The student list's Unpaid only filter is your "new sign-ups" inbox.
What students see when they log in
- Login page:
yourslug.acatudy.com/login. If you publish a custom login page in the Website Builder, that design is used. Students can also continue with Google. - Forgot password: students reset it themselves from the login page; they receive a reset link by email.
- Their home: the blocks you choose in My academy → Designer → Appearance → Student home (tests and exams, assignments, documents and media, calendar) and the menu from My academy → Designer → Appearance → Student menu.
No student limit
No plan limits the number of students, not even Free: enroll as many as you need. Plans differ in courses, questions, storage and features (see Storage and plan limits).
Edit or remove a student
Use Edit to change name, email, password (leave it blank to keep the current one), courses or paid status, then Update student. Delete removes the student from your academy and anonymizes their data, exactly as when a student deletes their own account: the text of their messages is erased, their grades, submissions and payments are kept anonymously and, if your academy was their only one, their name, email and photo are removed. If they belong to another academy, their account stays alive there. The confirmation warns you first and it can't be undone. See Privacy, cookies and student data.
Weekly report for parents
From the Basic plan, each student can have up to 2 parents or guardians (name, email, relationship and an Active switch) in Users › Edit › Weekly parent report. Turn the report on, and choose the day and time, in My academy › Weekly parent report; it's off by default and Send me a test report emails you a sample first. Each week they get a summary of the last 7 days (practice, exams, assignments, live class attendance and what's coming up) and a personal link to the full report that expires after 30 days, with no sign-in. Their email is only used for this report, never for marketing, and they can unsubscribe in one click. Students see who gets their report on their profile. Students 18 and over decide for themselves: add the date of birth in Users › Edit. For an adult (or a student with no date of birth on file) you can only suggest recipients, and nothing is sent until the student accepts on their profile, where they can also add up to 2 people, pause them or remove them. When a student turns 18, the existing contacts wait for their OK. Each person gets a welcome email with an example before the first report.
Frequently asked questions
Can I import students from a CSV file?
Yes. In Users, click Import students: paste a list or upload a CSV or Excel file, check the preview and import. Each student gets a link to create their password. See Migrate from other platforms.
A student says they can't see a subject. Where do I start?
Follow the checklist in A student can't see a subject or its content.
Can a student be in two courses?
Yes. Tick both, e.g. Grade 11 and SAT Prep; they'll see the subjects of both.
Can I message my students?
Yes. Students write to you from their area and you answer from Communication → Student messages; your reply is also emailed to them. For announcements to many students, see Email marketing and automations.
Follow this guide in your own academy
Create it free in a couple of minutes and keep your admin panel open next to this guide.
Open a ticket from Help → Support in your panel: we reply within 24–48 h depending on your plan.