
Create your academy: sign up, setup wizard, tax details and plan
Go from zero to a working academy in about 15 minutes: pick your subdomain, run the 5-step setup wizard, add your tax details and choose the plan that fits your student count.
On this page
In this topic 5
In this guide
- Register your academy and choose its web address (
yourname.acatudy.com). - Complete the 5-step setup wizard: what you teach, how many students, branding and modules.
- Add your tax details (EIN, address) so you can subscribe to a plan.
- Compare plans and upgrade from My academy → Billing → My subscription.
Throughout this guide we'll follow a real-world example: Brightpath Tutoring, a small SAT/ACT prep center in Austin, TX with two tutors and about 60 students.
1. Register your academy
-
Open the sign-up form
Go to acatudy.com/register-academy (or click Start free in the top menu). You can start on the Free plan, which never expires and needs no credit card. Paid plans activate as soon as the payment is confirmed.
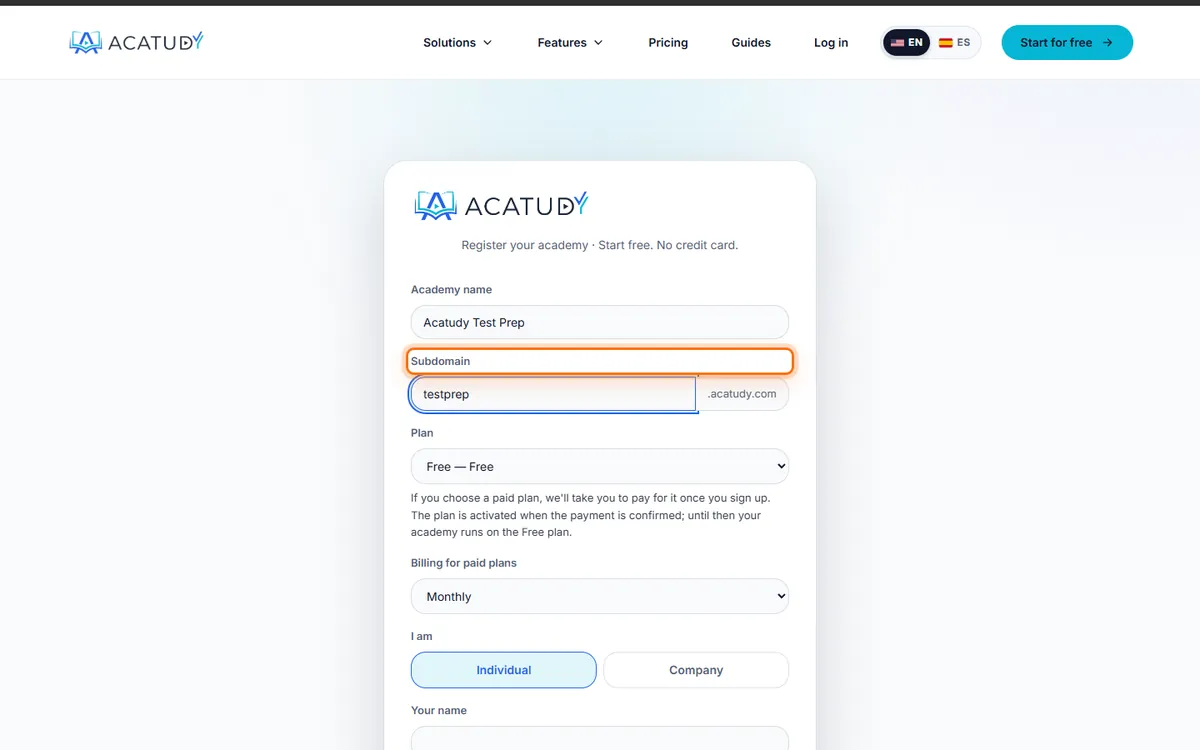
Sign-up form with the Subdomain field highlighted. -
Fill in your academy and account details
- Academy name: the public name your students will see, e.g. Brightpath Tutoring.
- Subdomain: your academy's address. Use lowercase letters, numbers and single hyphens, up to 63 characters, e.g.
brightpath→brightpath.acatudy.com. Some names are reserved (www, mail, api, app, admin…). - Your name, Your email and a Password of at least 8 characters. This becomes the owner account.
- I am: Individual or Company. Companies can enter their legal name, tax ID and address right away; individuals add them later.
-
Submit and land in your admin panel
Your academy is created instantly, you're signed in automatically and a welcome email arrives in your inbox. There is no email verification step to wait for.
Choose the subdomain carefully
The subdomain is fixed once the academy is created: the wizard shows it but can't change it. If you want a branded address like learn.brightpathtutoring.com, connect a custom domain later (see Connect your own domain).
2. Run the setup wizard
The first time you open your dashboard, the Setup wizard starts on its own. Every step has a Set up later button, so you can skip anything and come back.
-
What do you want to build?
Pick A course (a single program, e.g. an 8-week SAT bootcamp) or A full academy (several grade levels and subjects). A course is smaller and more focused than an academy, so it gets its own setup: the next step asks what kind of course it is.
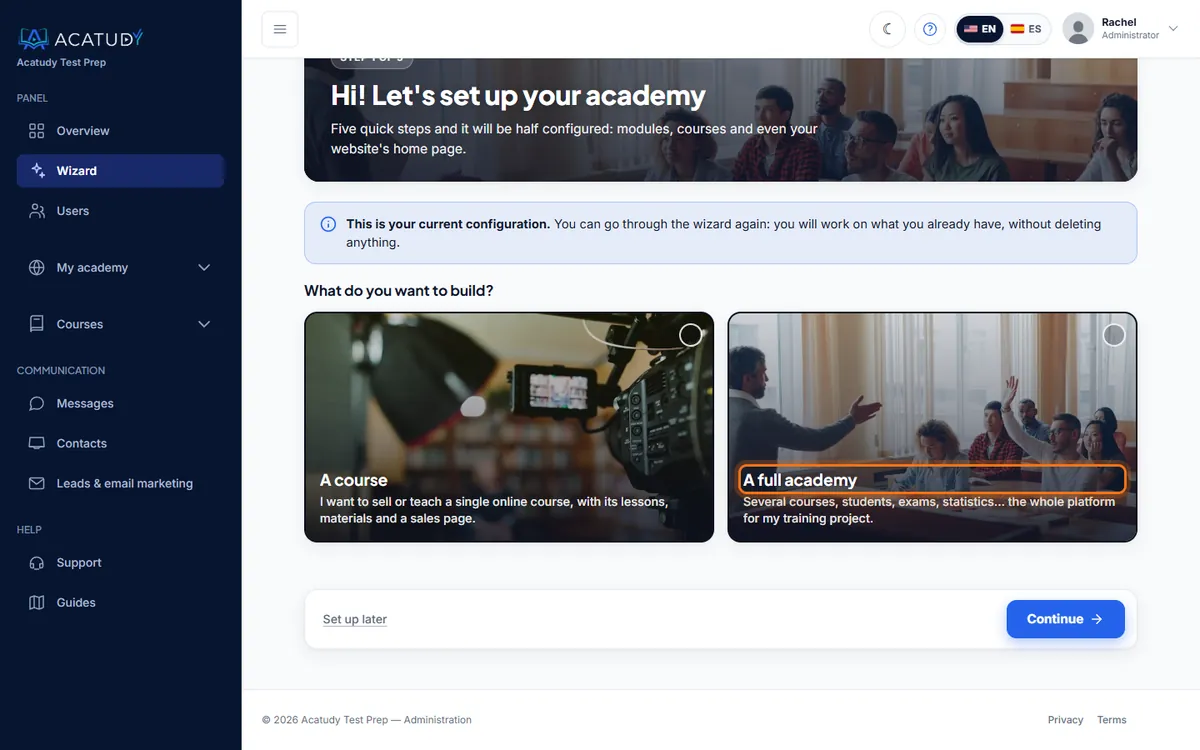
Setup wizard, step 1: A course or A full academy. -
What kind of training will you deliver?
Choose the card closest to your business, for example SAT / ACT prep, K-12 tutoring center, Online high school, Nursing prep (CNA/NCLEX), Language academy or Private tutor. You can also describe it in your own words; the wizard uses it to suggest modules.
If you chose A course, this step becomes What kind of course are you creating? Each type turns on only what that course needs and turns everything else off, so your students never see empty menus. Every type uses the course view (the course shows up as soon as students log in) and creates one subject with sample units:
Course type What it turns on Good for Video-only course Subjects and units, notifications and certificates (optional). No tests, exams, stats or leaderboard. Recorded lessons with downloadable resources. Prep for a specific exam Question bank, tests by topic, custom tests, timed exams, stats, missed-question review and calendar. The wizard asks for the official exam date and adds it to the calendar as a key date. SAT, ACT, GRE, licensing or civil service exams. Course with certificate Lessons, graded assignments and a certificate on completion (you can switch it to a final assignment). Certified programs. Live course / cohort Calendar, assignments, documents and the Live classes menu (live classes, recordings, 1:1 tutoring). Professional plan. A group that moves forward together. Masterclass or short workshop 1 to 3 units with video and resources, no grading. A free class to attract students. Corporate / compliance training Required reading with confirmation, a final test in Exams, a certificate on completion and per-employee progress in the gradebook. Mandatory employee training. Membership / ongoing content A growing library of videos and documents, calendar and notifications. Charge a monthly or yearly subscription from Payments (Stripe). Content released every month. 1:1 tutoring or coaching Bookable 1:1 sessions, calendar, between-session assignments and materials. Professional plan. Mentoring and private coaching. Types that need live classes show a lock on lower plans. Everything the wizard turns off can be turned on later in My academy → General → Modules.
-
Who are you and how many students do you expect?
Choose company or individual professional and a student range (0–25, 26–50, 51–100, 101–250, 250+). The wizard suggests the plan that usually fits that size, e.g. "With 51–100 students the Professional plan fits you". It's only a suggestion: no plan limits the number of students.
-
Give your academy its identity
Confirm the name, upload your logo (image up to 2 MB, transparent PNG recommended) and pick up to four brand colors: primary, secondary, background and text. A live preview shows how your students' area will look.
-
Review and create
The Overview step lists the modules that will be switched on. Untick anything you won't use; modules above your plan are labelled Available on plan…. Click Create my academy: the wizard applies your branding, turns modules on and creates a draft home page for your website (not published until you decide).
When it finishes you'll see Your academy is ready! with shortcuts to open your page in the Website Builder, invite students or go to the dashboard.
Tip
You can re-run the wizard any time from Settings → Wizard in the sidebar. It works on top of your current setup and never deletes content.
3. Add your tax details
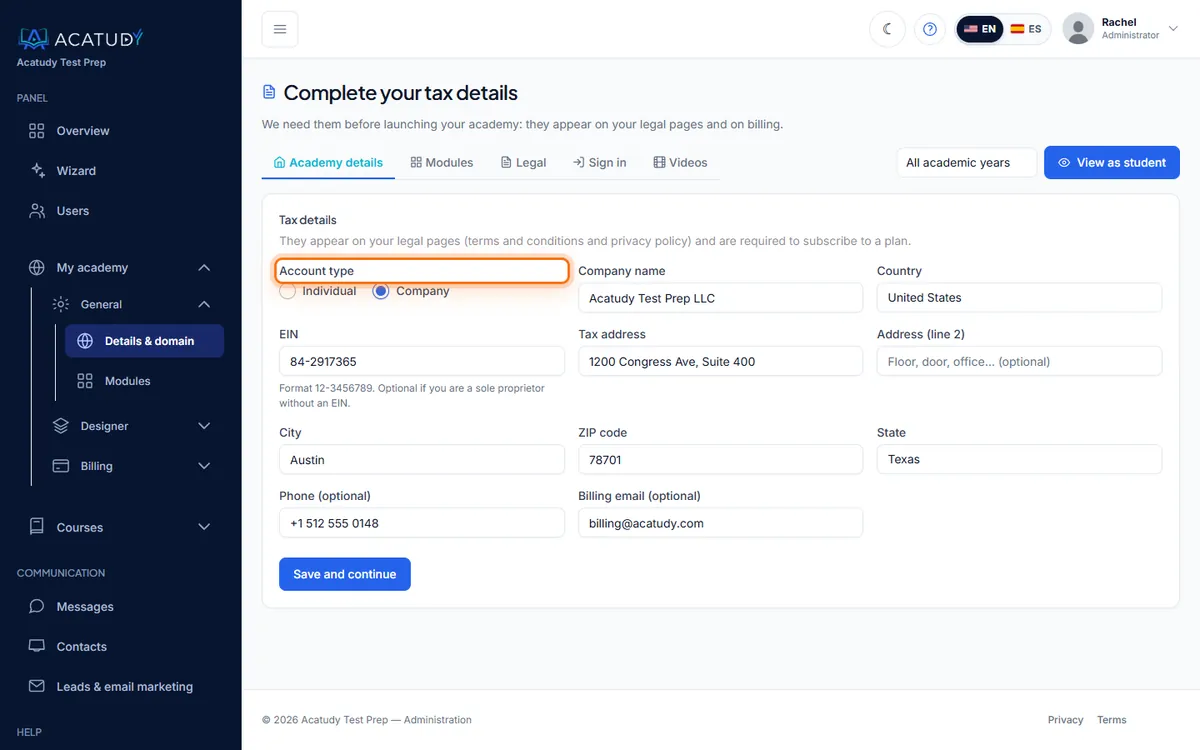
Before you can subscribe to a paid plan, the panel asks you to Complete your tax details. You can also fill them in any time from My academy → General → Academy details, section Tax details.
| Field | US example | Notes |
|---|---|---|
| Account type | Company | Individual or Company. |
| Legal name | Brightpath Tutoring LLC | Individuals enter first and last name instead. |
| Tax ID (EIN) | 12-3456789 | Optional for a sole proprietor without an EIN. |
| Country / State | United States / Texas | State is required for the US, Canada and Italy. |
| Address, City, ZIP code | 500 Congress Ave, Austin, 78701 | ZIP or ZIP+4 is validated. |
| Phone, Billing email | (512) 555-0142, [email protected] | Optional. |
These details appear on your subscription invoices and fill in the legal texts (terms and privacy) generated for your academy. Sales tax is calculated by Stripe Tax at checkout.
4. Choose your plan
Plans differ in how many courses (grade levels or programs, not individual subjects) and questions you can have, plus storage and a few advanced features. No plan limits the number of students:
| Free | Basic | Professional | Institutional | |
|---|---|---|---|---|
| Courses | 1 | 3 | 10 | 20 |
| Students | Unlimited | Unlimited | Unlimited | Unlimited |
| Questions | 100 | 1,000 | 10,000 | Unlimited |
| Storage | 10 GB | 25 GB | 75 GB | 200 GB |
| New exams per month | 1 | Unlimited | Unlimited | Unlimited |
| Custom domains | — | 1 | 1 | 1 |
| Certificates, ranking, community | — | — | ✓ | ✓ |
| Full Website Builder, email marketing, coupons | — | — | ✓ | ✓ |
| Support response time | 48 h | 48 h | 24 h | 24 h |
Current prices are always on our Pricing page. Annual billing saves you 20%.
-
Open My subscription
Go to My academy → Billing → My subscription. You'll see your current plan, its status and your usage.
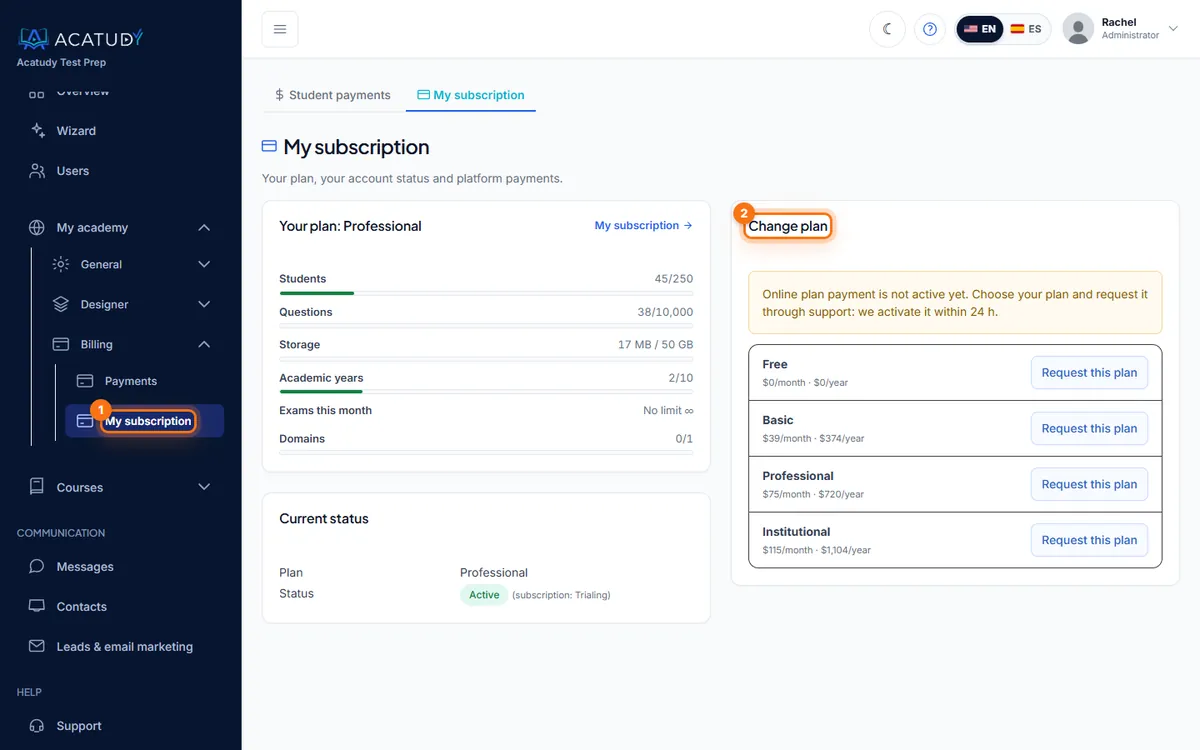
My subscription page with plan usage and Change plan. -
Click Monthly or Annual on the plan you want
You're taken to a secure Stripe checkout. Once paid, the new limits apply immediately.
-
Card, invoices and cancellation
Use Card and billing details to update your card, tax details or download invoices in Stripe. To change plan or cancel, stay in My subscription. If you cancel, you keep your plan until the end of the period you've paid for (you can resume before then) and your academy then moves to the Free plan: it's never paused. Within 14 days of your first payment you can ask for a full refund and move to Free right away.
What happens when I hit a limit?
Nothing breaks: the panel simply stops you from adding more (for example "You've reached your plan's student limit. Upgrade your plan to add more.") and shows an Upgrade plan button. The Your plan card turns amber at 70% of a limit and red at 90%. More in Your Acatudy subscription and Storage and plan limits.
Frequently asked questions
Do I need a credit card to start?
Not for the Free plan: it never expires and needs no card. You only add a payment method when you choose a paid plan, and that plan activates once the payment is confirmed.
Can I have more than one academy?
Yes, on paid plans. Only one active Free academy is allowed per owner or tax ID.
Is the "Improve configuration with AI" button a chatbot?
No. It applies smart rules based on what you told the wizard (type of training, student count) to suggest modules and layout. You always review the result before creating.
Launch checklist: get found on Google
Once your academy is set up (courses, website and branding), make it public and let Google know it exists:
-
Connect your own domain (optional, paid plans)
In My academy → General → Academy details → Your own domain add an address like
learn.brightpathtutoring.comand create the DNS records it shows you. Step by step: Connect your own domain, with instructions for GoDaddy, Namecheap, Cloudflare and other providers. -
Publish your website
In Website Studio, publish your homepage and the pages you want public. Drafts are never indexed.
-
Add it to Google Search Console
Verify your academy's address in Google Search Console and submit its sitemap (
/sitemap.xml, generated automatically) so Google indexes it in days instead of weeks. How: SEO and Google Search Console.
Next steps
Now organize your catalog: read How courses, subjects and units fit together.
Follow this guide in your own academy
Create it free in a couple of minutes and keep your admin panel open next to this guide.
Open a ticket from Help → Support in your panel: we reply within 24–48 h depending on your plan.