
Build and publish your website with the Website Builder
Create your academy’s homepage and landing pages without code: start from a template like “SAT/ACT Test Prep”, add blocks, adjust colors and animations, preview on mobile, set the page SEO and publish.
On this page
In this topic 7
- Design your student area: styles, logo, colors, home and menu
- Build and publish your website with the Website Builder
- Connect your own domain (CNAME or A record) with automatic HTTPS
- SEO and Google Search Console: sitemap, robots.txt and site verification
- Design your sign-in and sign-up pages: 14 layouts with your image and text
- FAQs for your students and visitors: help center, order and FAQ rich results
- WordPress plugin: sell your courses and add single sign-on
In this guide
- How the Website Studio is organized (scopes and pages).
- Create a page from a template.
- Add and edit blocks, colors, animations and FlyonUI-style effects.
- Preview on mobile, fill in the page SEO and publish.
Before you start
- The full Website Builder (new pages, templates, publishing, animations and reusable components) is included in the Professional and Institutional plans. Free and Basic include basic web design.
- If you ran the setup wizard, you already have a draft home page waiting for you.
1. Know the Studio
Open My academy → Designer → Website Builder. Pages are grouped into four scopes:
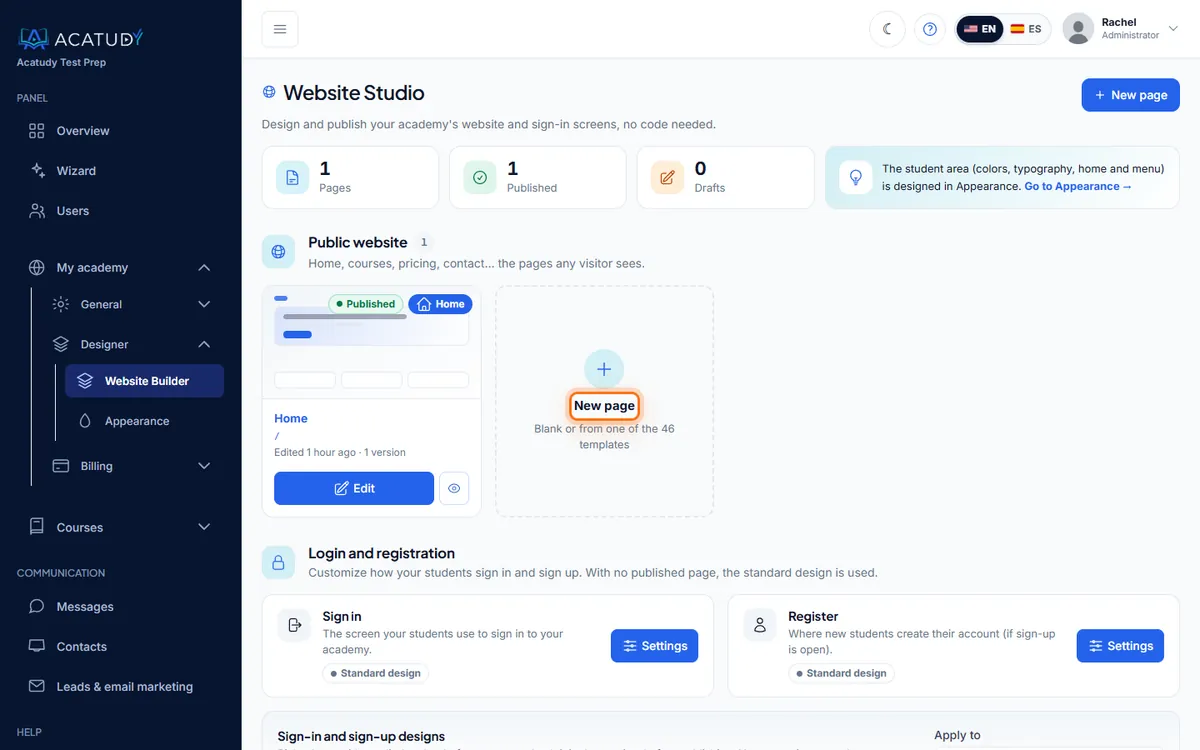
- Public website: home, landing pages, courses, pricing, contact, FAQ, blog…
- Login and registration: your branded login, sign-up and password pages.
- Checkout and access: the access page.
- Student area: pages inside the student area, plus Configure menu.
Each page shows its status (Published or Draft), its URL and how many versions it has.
2. Create a page from a template
-
Click New page
Choose the Scope (e.g. Public website), the Page key (e.g. landing), a Title (Fall SAT Bootcamp) and, for website pages, a Slug (
sat-bootcamp). -
Pick a starter template
In Starter template (optional) choose Use a template. There are 30 page templates you can filter by type and goal (capture leads, sell, event), such as SAT/ACT Test Prep, K-12 Tutoring Center or Event / webinar. Or choose Start blank.
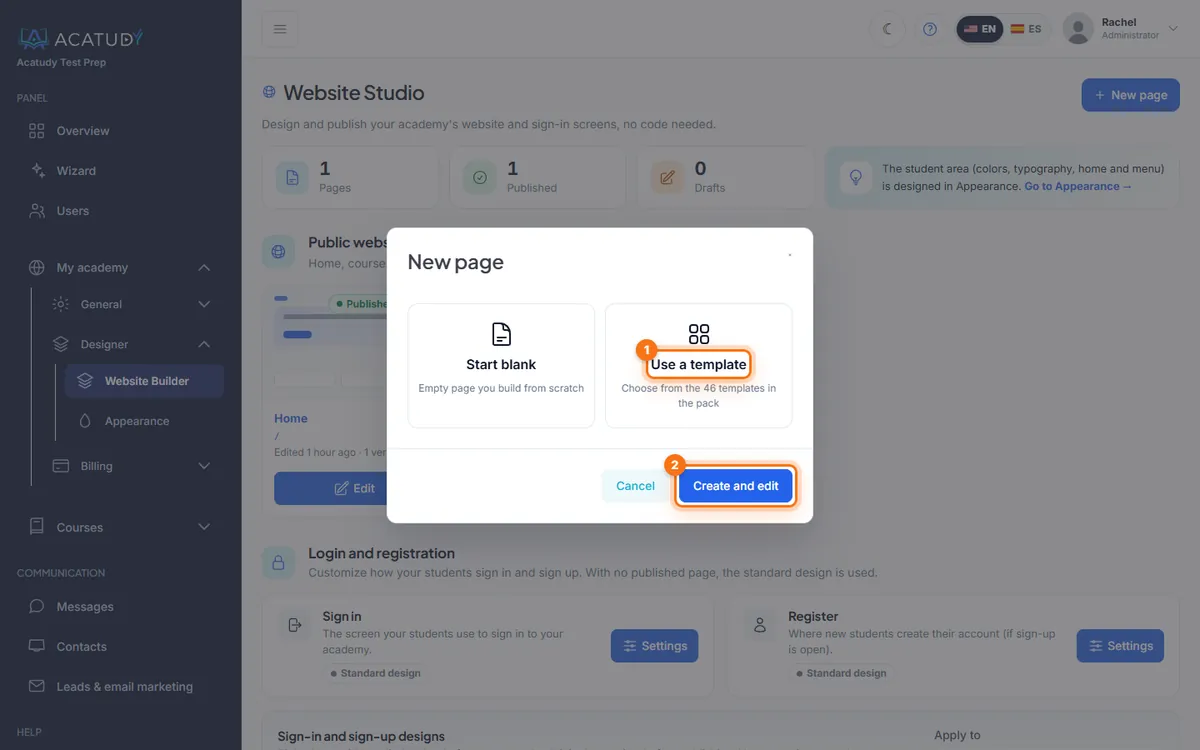
New page dialog: Start blank or Use a template. -
Decide on global styles
When you apply a template, the Studio asks whether to also apply its style (colors, fonts, borders) to all your pages as Global styles. Say yes on your first page for a consistent site.
3. Edit blocks
The left panel has three tabs:
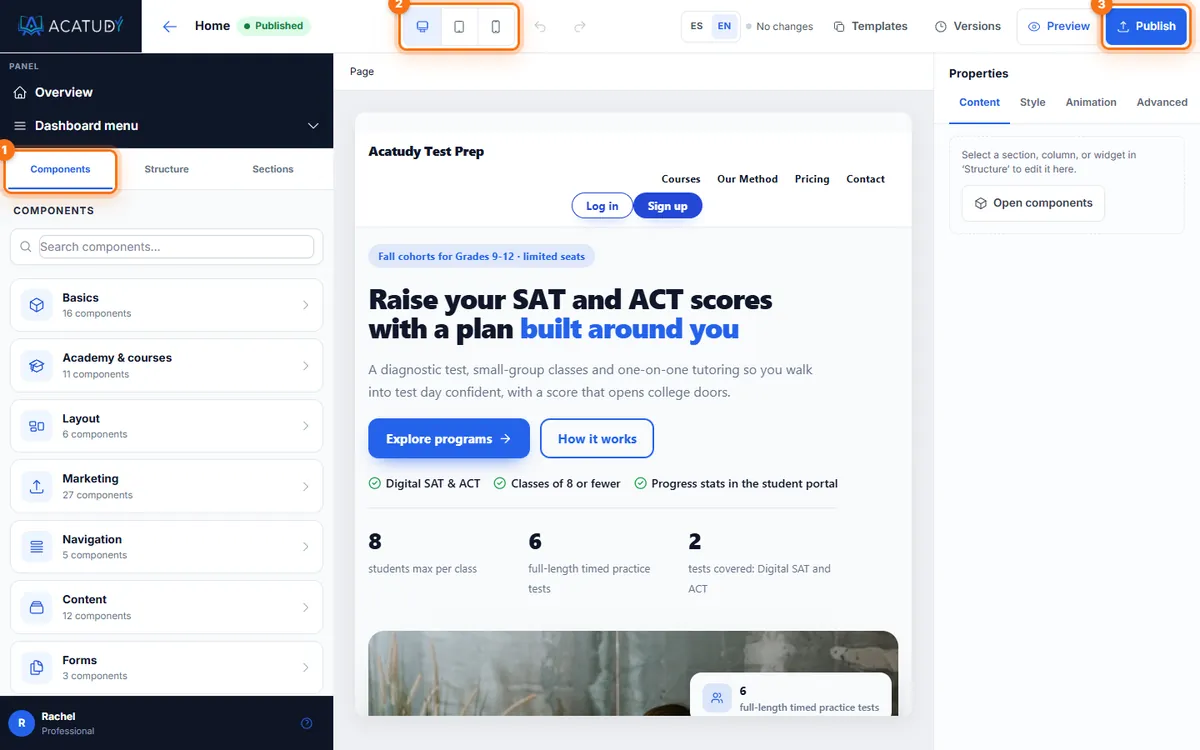
- Components: search or browse nine categories: Basics, Academy & courses, Layout, Marketing, Navigation, Content, Forms, Advanced and Student area. Each block comes in several variants with a thumbnail. Click to add it.
- Structure: the tree of your page, plus the Getting started guide that checks you have a header, a hero, main content, a footer and SEO.
- Sections: ready-made full sections (e.g. header with menu, pricing table, testimonials).
-
Add a block
Example: from Academy & courses, add a course grid below the hero; from Marketing, add a testimonials block with three parent quotes.
-
Select it and edit
Click any block on the canvas to edit its texts, images (from the Media library), links, colors and spacing in the right panel. Spacing and visibility can be set per device.
-
Add motion (optional)
Choose a page animation preset (Minimal, Dynamic, Impactful, Elegant), an entrance animation per element, or a component effect in Effect (FlyonUI style): staggered reveal, hover lift, 3D tilt, glowing border, animated counter, marquee, rotating 3D text, soft parallax, animated gradient, shine sweep or image reveal. Buttons have hover, click and "continuous attention" effects.
-
Save what you reuse
Reusable components lets you save a block (like your footer) and reuse it on every page; update it once and compare versions.
Tip: always check mobile
Most parents will open your site on a phone. Use the Desktop / Tablet / Mobile switch in the top bar before publishing. Undo and Redo are always there, and your work autosaves.
4. Fill in the page SEO
Open Page SEO from the page structure and fill in: Page title, URL / slug, SEO title (optional) (up to 190 characters, e.g. SAT Prep in Austin, TX | Brightpath Tutoring), Meta description (up to 300 characters, with a counter) and a featured Open Graph image for social sharing. Click Save SEO. More in SEO and Google Search Console.
5. Publish
-
Preview
Click Preview to see the page exactly as visitors will.
-
Click Publish
Publishing freezes a new version with the current design; that's what visitors see. Your draft stays editable, so you can keep working without affecting the live page. Website pages are only reachable at their URL once published.
-
Set it as your home page
Back in the Studio, use Set as home on the page. The previous home is kept, renamed home_backup.
Made a mistake? Versions opens the Version history, where you can compare and Restore version.
Uiverse library: hundreds of ready-made UI elements
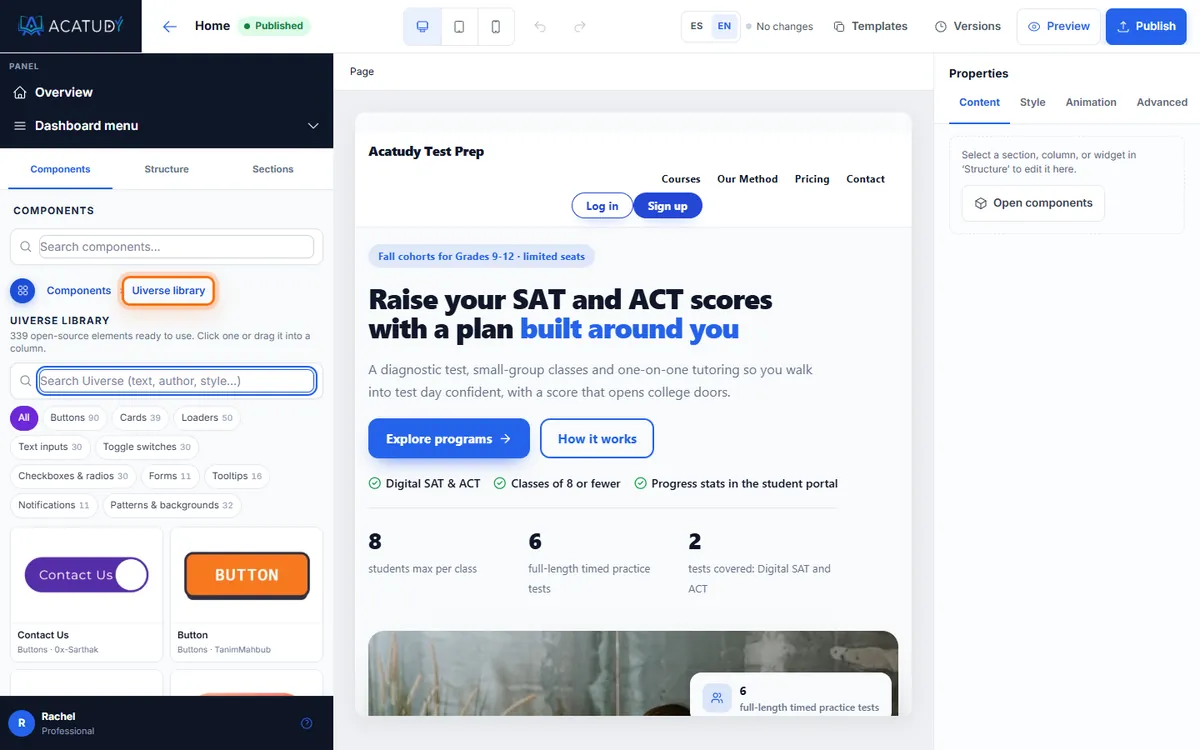
Besides the Studio blocks, the Components tab has a Uiverse library card with more than 300 open-source elements from Uiverse.io: buttons, cards, loaders, text inputs, toggle switches, checkboxes and radios, forms, tooltips, notifications and background patterns.
-
Find an element
Click Uiverse library, pick a category (e.g. Buttons) or type in Search Uiverse (text, author or style). More elements load as you go with Load more.
-
Add it
Click the thumbnail to add it to the selected column, or drag it onto the page.
-
Customize it
In Properties you only see what that element supports: its texts (e.g. Button label), the Button link (a page like
/coursesor a full URL), the placeholder of an input, Use the academy color or a Main color, and the alignment. Background patterns also have a height and an optional title. Swap for another element replaces it keeping the link and colors.
Safe by design
Each element runs in its own isolated container: its styles can't change the rest of your page, and it never runs JavaScript. Uiverse forms are visual only; to collect leads use the Contact form block.
The elements are used under the MIT license. Credits and the license text are in License & credits, at the bottom of the library panel; each element shows its author when you select it.
Forms and leads
The Contact form and Newsletter signup blocks save every submission in Communication → Leads & email marketing and email you a notice. They're protected against spam bots.
Build your site with Kody (AI)
Kody is the Website Builder's AI assistant (Professional and Institutional plans). Click Build my site with Kody in the Website Studio and answer a few questions: type of academy (SAT/ACT test prep, K-12 tutoring, nursing, online high school, languages…), name, who it's for, what makes you different, your main courses, tone, whether to use your brand color, the site language (English, Spanish or both), the main goal (sign up, request information or buy a plan) and which sections you want (testimonials, pricing, FAQ, team). Surprise me lets Kody pick the style and layout.
Kody builds a proposal
You'll see its progress step by step (thinking, structuring sections, writing copy, login and sign-up design, laying out). It only uses real Studio blocks, styles and sign-in designs, so everything stays editable.
Review it
Preview the homepage, the login and the sign-up screens on desktop and mobile (and in each language). You can Regenerate a single section, Try another style (free, no AI) or Discard it.
Use the draft
Use this draft or Open in the editor creates the page as a draft: Kody never publishes. If you already have a homepage, it's created as a new page and your current one isn't touched; the login and sign-up design goes to their drafts. Then publish from the Studio as usual.
Kody never makes up facts
No figures, ratings, reviews or names: testimonials and team cards are sample placeholders, prices show $XX, and any figure it can't know becomes [X]. Replace them with your real data before publishing.
Monthly allowance: Professional 5 websites and Institutional 10 per academy. The counter on Kody's page (Websites this month: 1 / 5) shows what you've used and resets on the 1st of each month. You can keep up to 20 Kody websites at a time: discard one to create another. Only finished websites count; regenerating a section and trying another style don't. If you move to a lower plan, the websites you already generated stay where they are.
Frequently asked questions
Can I build the page in English and Spanish?
Yes. The top bar has a Page language switch (EN/ES) so you can edit the English and Spanish versions of the same page.
How big can my images be?
Files in the Media library can be up to 4 MB each (images, videos, SVG or fonts). Organize them in folders and tags.
Can I use my own domain for the website?
Yes, on Professional and Institutional plans: see Connect your own domain.
Follow this guide in your own academy
Create it free in a couple of minutes and keep your admin panel open next to this guide.
Open a ticket from Help → Support in your panel: we reply within 24–48 h depending on your plan.