
Add lessons, videos and required reading to a subject
Upload PDFs, slides, links and videos to each unit, mark documents as required reading, build interactive videos with in-video questions and see who actually finished the material.
On this page
In this guide
- The five resource types and their limits.
- Make a document required reading and see who confirmed it.
- Create an interactive video that students must watch to the end.
- How progress is calculated and when to use Files instead.
Example: in Grade 10 → Biology → Unit 3: Cell Structure we'll add a lecture video, a lab safety PDF that every student must read, the slides and a link to a virtual microscope.
Add a resource to a unit
-
Open the unit
Go to Courses → Subjects, click Edit on the subject and scroll to Units.
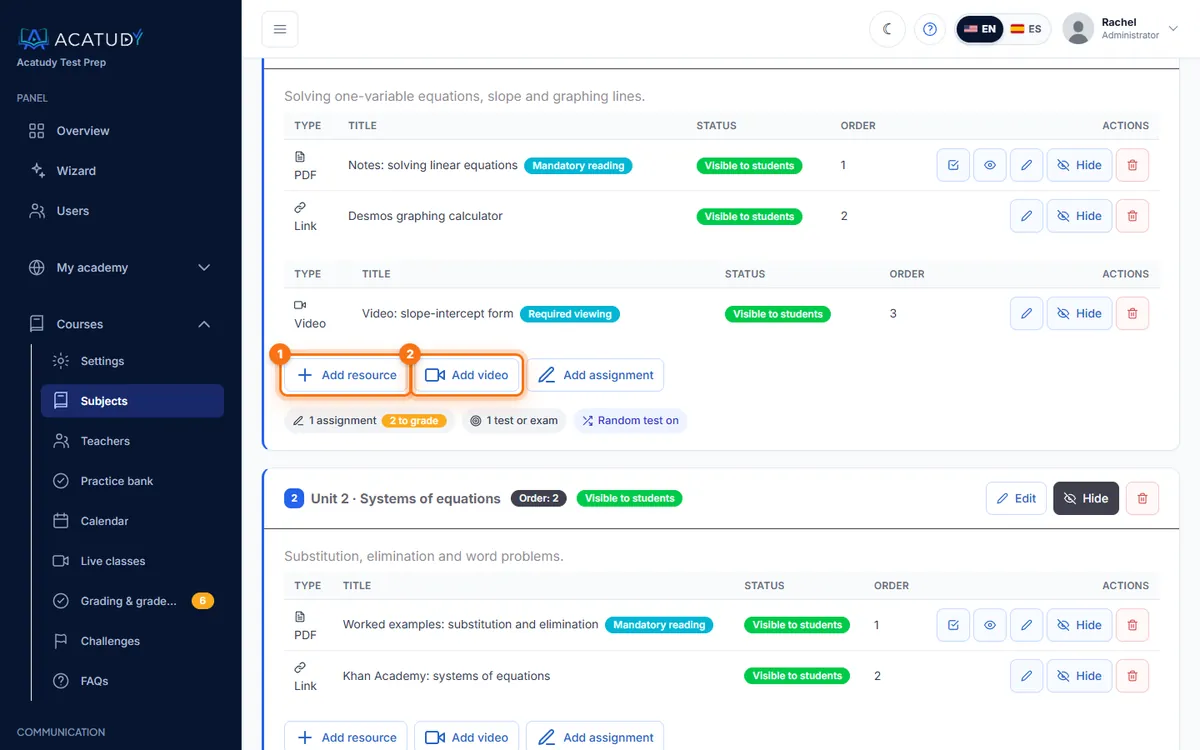
A unit with its resources and the Add resource and Add video buttons. -
Click Add resource and choose a type
Type Accepted Example PDF .pdf Lab safety rules Image .jpg, .png, .webp, .gif Diagram of an animal cell Video .mp4, .webm, .mov, .m4v, .mkv upload, or a YouTube/Vimeo URL Lecture: organelles in 12 minutes Document .pdf, .doc(x), .xls(x), .ppt(x), .txt Unit 3 slides (.pptx) Link Any external URL Virtual microscope simulator Videos can be up to 20 GB each; other files, up to 50 MB. Every video counts toward your plan's storage, like everything you upload: there's no limit on the number of videos, only your plan's storage caps the total (the field under the upload button always shows your current maximum, and the Your plan panel on your dashboard shows how much you've used).
-
Give it a clear title and save
Use titles students can scan: "3.1 Lecture — Organelles (12 min)" beats "video1.mp4". The resource appears in the unit right away.
Tip: long videos
A full lesson recording (1–2 hours) uploads fine: the video goes up in parts, several at once and straight to your academy's cloud storage, with a progress bar, speed and time left. If your connection drops, it resumes on its own; if you close the page, choose the same file again and it continues where it left off. You can keep filling in the form while it uploads. Even a 20 GB recording works; afterwards it's compressed automatically (see below) so it takes up less of your storage. If you'd rather not use your storage, you can still host it on YouTube (unlisted) or Vimeo and add the external URL.
Make a document required reading
For PDFs and documents you can tick Mandatory reading. The student must read the document to the end and press I have completed the reading to confirm.
On the resource you'll see Reading confirmations: who confirmed and when. Perfect for a syllabus, a lab safety sheet or your academy's code of conduct.
Create an interactive video
Interactive videos go further than a plain video resource: you can require full viewing and pause the video to ask questions.
-
Click Add video in the unit
Upload the video file (MP4, WebM, MOV, M4V or MKV, up to 20 GB; it counts toward your plan's storage) and, if you like, private teacher notes.
-
Turn on Required viewing
With Required viewing the student must watch the video to the end. It's validated on the server, so skipping ahead doesn't count.
-
Add interactions at specific times
In Video interactions, choose a timestamp (mm:ss) and a type: question (multiple choice, true/false, multiple answers or short answer), information, text, image, explanation, link, call to action, pause, mini-challenge or points. Example: at
04:30, "Which organelle produces ATP?" -
Optional: attach a test, assignments and documents
Each video can have its own video test (5–300 minutes, 1–10 attempts, up to 50 questions), linked assignments and supporting documents.
Compress videos to save space
When you upload a video (an interactive video, a Video resource or an assignment video), the Compress to save space switch is on by default with your academy's quality. The video is recompressed in the background to MP4 (H.264) so it uses less of your plan's storage and loads faster for students, with barely noticeable quality loss. Recommended: Balanced 720p for lessons. Formats, the 20 GB limit, statuses and playback optimization are explained in Upload and compress videos.
Videos over 500 MB are always compressed: the switch appears on and locked. When you choose the file, the form shows the expected savings and, for very long videos, roughly how long compression will take; the same estimate appears next to the video while it's queued or compressing (a 20 GB recording can take a few hours). Your storage counts the original size while it's being compressed and is updated to the compressed size when it finishes; deleting a video (or its unit, subject or assignment) frees its space.
| Quality | Max. resolution | Best for |
|---|---|---|
| High | 1080p | Small text, code, whiteboard |
| Balanced (default) | 720p | Most lessons |
| Light | 540p | Talking-head videos, maximum savings |
- While it's being compressed, the original keeps playing and students don't lose their progress (the length doesn't change).
- Next to each video you'll see its status: Queued, Compressing…, Compressed — saved 64% · 820 MB → 295 MB, No changes (it didn't save at least 15%, so the original is kept) or Error with a Retry button.
- From the video's edit page you can recompress with another quality. It starts from the current file, so a higher quality won't bring back detail already lost.
- Set the academy default in My academy → General → Academy details → Videos. Resolution is never increased and the aspect ratio (including vertical phone videos) is kept.
How progress is calculated
A subject's progress percentage counts the active resources in active units. When a student opens or completes them, their bar moves. Interactive videos are tracked separately (viewing, interactions and tests) and don't change that percentage.
Want students to go in order? In the subject, enable Sequential progress → Lock content in order.
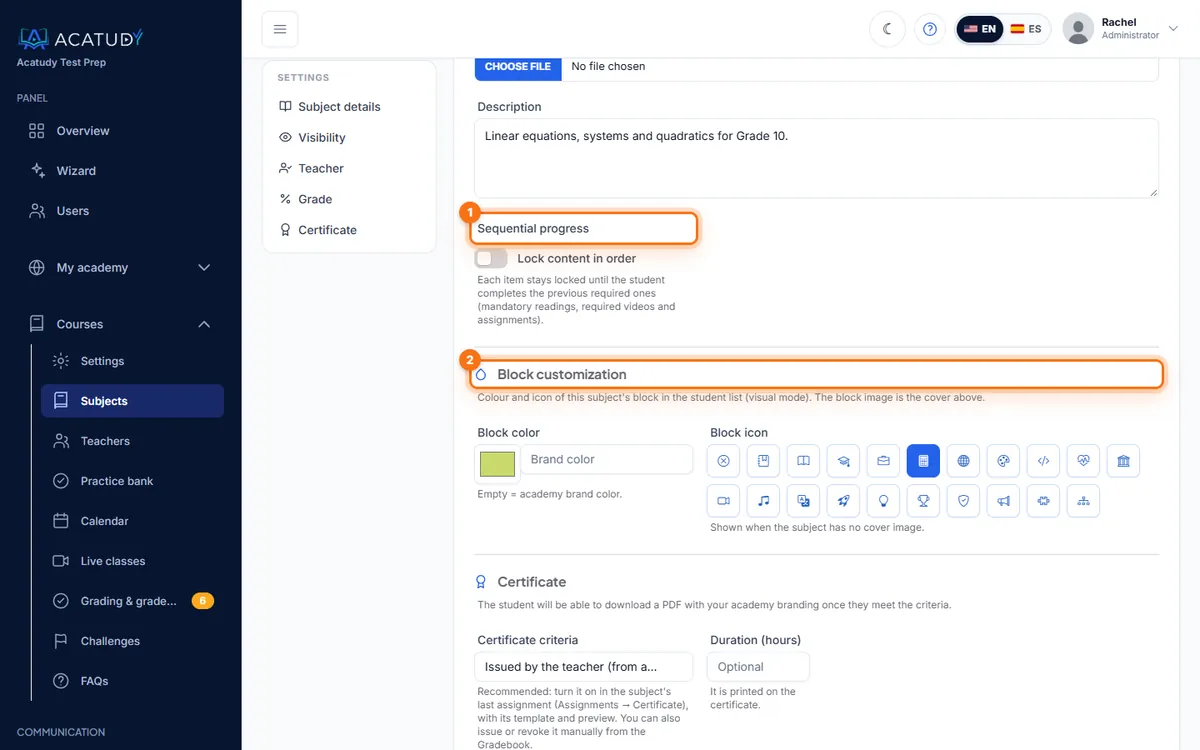
Required vs. optional
A plain video or document resource is optional unless you mark it as mandatory reading (documents) or required viewing (interactive videos). To make students finish material before handing in work, attach it to an assignment as assignment materials: they can't submit until they've watched and read it. See Assignments.
Files: a shared library
Courses → Files (visual mode) is a folder library for documents you want to share outside a specific unit (handbooks, calendars, forms). It accepts JPG, PNG, PDF, DOC and DOCX, counts toward storage and is never mandatory nor part of subject progress.
Frequently asked questions
Can I hide a resource without deleting it?
Yes. Every resource and unit can be edited, deactivated (hidden from students and left out of progress) or deleted from the subject's edit page.
What do students see?
Either a vertical, step-by-step list (classic) or visual blocks, depending on Student view in the subject (set for the whole academy in My academy → Designer → Appearance → Brand identity → Student area mode; see Visual or vertical mode).
Where do I see how a subject is going?
Each subject has a statistics page with its students, units, resources, assignments, exams, submissions waiting to be graded and average scores. Teachers see it for their own subjects.
Follow this guide in your own academy
Create it free in a couple of minutes and keep your admin panel open next to this guide.
Open a ticket from Help → Support in your panel: we reply within 24–48 h depending on your plan.